TITLE: CAPD EXCHANGE PROCEDURE
PURPOSE: To aseptically perform a Continuous Ambulatory Peritoneal
Dialysis exchange (CAPD) using the Ultrabag system.
DEFINITIONS: 1. Tenckhoff Catheter – an implanted tunneled catheter placed
surgically into the peritoneum with an external portion ending
at the Titanium adapter.
2. Titanium Adapter – metal connector at the end of the
Tenckhoff, usually placed in surgery. It connects to the
transfer set. You may order the titanium adapter from
Central Service,
3. Transfer Set – Replaceable, soft plastic, six inch tubing,
attached to the Tenckhoff’s titanium adapter. The transfer
set gets connected to the Ultrabag tubing during exchanges.
It remains capped and attached to the Tenckhoff at all times.
It must be replaced if the tip becomes contaminated.
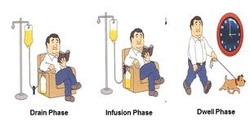
4. Exchange – draining dwelling fluid from the peritoneum and
filling with new dianeal fluid that will cause dialysis of
metabolic waste.
5. Dianeal – fluid used to do a CAPD exchange.
6. Effluent – fluid drained from the peritoneum after dwelling in
for 4 to 6 hours, per orders.
7. Ultrabag System – Dianeal fluid and tubing
EQUIPMENT:
Special considerations:
♦ Catheter care and the dressing change should be done
every 24 hours. (See dpd01).
♦ Place all the CAPD supplies on a dedicated table surface
inside the patient's room.
♦ The table surface must be cleaned with a hospital-approved
disinfectant wipe prior to use.
♦ The measuring suction canister and the dedicated
disposable suture set used to cut drainage tubing, will be
maintained in the patient's bathroom.
1. Ultrabag (tubing and dianeal fluid preconnected in factory
sealed bag)
2. Two blue gripper clamps
3. Minicap Disconnect cap (5C4466)- (white colored)
4. IV pole
5. Alcohol bottle and denture cup to soak blue clamps.
6. Face masks
7. Sterile gloves
8. Clean gloves
TITLE: CAPD EXCHANGE PROCEDURE
(dpd02)
PAGE: 2 of 5
9. Electric hot water bottle (EHWB)
10. Small biohazard red bag
11. Suction Canister to measure effluent
12. Disposable suture kit
13. Disinfectant wipes to clean working surface as alcohol is not
an appropriate surface disinfectant.
14. Hanging scale, as needed
PROCEDURE: A. PREPARE THE FIELD AND EQUIPMENT:
1. Check the doctor’s order, and make sure the prescribed
Dianeal fluid (Volume; Dextrose Concentration; and
Calcium Content) is being given to the patient Be alert for
order changes.
2. Warm the Ultrabag with the electric hot water bottle (EHWB)
without opening package. When a Dianeal bag is removed
from the EHWB warming pad, the prescribed Dianeal bag
for the next exchange should be placed in the warming pad.
The nurse should check with the back of the hand that the
Dianeal is not overheated, and that the warming pad is
functioning appropriately.
3. Close the patient’s room door and post the sign “Procedure
in Progress, Do Not Enter.”
4. Perform hand hygiene and don isolation / clean gloves.
5. Clear the bedside table, and clean with a disinfectant wipe.
6. Perform hand hygiene.
7. Put on a surgical mask. The patient and anyone else in the
room will wear masks when the system is to be opened
(i.e. connecting, disconnecting).
8. Perform hand hygiene after applying the mask.
9. Remove the Dianeal bag from the warming pad, and open
the Ultrabag package.
10. Inspect the bag and tubing; do not use if solution is leaking
or is in the tubing.
11. Inspect the pull ring. Do not use the dianeal if the pull ring is
off.
12. Hang the Dianeal bag on the IV pole. Apply the blue clamp
to the fill line.
13. Expose patient’s transfer set from beneath clothing. You
may need to remove the tape which anchors the Tenckhoff
Catheter to the patient’s abdomen. DO NOT use scissors to
remove the tape from the catheter. Make sure the transfer
set is in the locked position
14. Perform hand hygiene and don sterile gloves
B. CONNECT:
1. Verify the volume, concentration and calcium of the Dianeal
bag.
2. Remove the pull ring from the Ultrabag. While keeping the
ringless end sterile, remove the disconnect cap from the
patient's transfer set and immediately connect to Ultrabag.
(To attach, turn the Ultrabag tubing not the transfer set).
TITLE: CAPD EXCHANGE PROCEDURE
(dpd02)
PAGE: 3 of 5
NOTE: The uncapped transfer set must never be
touched except by the sterile ringless end of the
Ultrabag tubing. If the transfer set is contaminated, a
transfer set change must be performed. Notify a nurse
on 7 WT to perform this procedure (dpd12).
3. Masks can be removed when the transfer set is connected to
the Ultrabag tubing.
4. Place the wrapper from the sterile glove package or a towel
on the floor and place the drainage bag on it with the shiny
side up. The white paper or towel provides a good
background for checking the character of the effluent.
C. DRAIN:
1. Break the green frangible (near the “y” end of the dianeal
connector tubing.
2. Twist open the transfer set to drain. (Usually takes
about 20-30 minutes to drain).
3. When drainage is complete, twist close the transfer set and
clamp the drain line with a blue clamp.
D. FLUSH:
1. Break the green frangible located in the fill line, near the
neck of the Dianeal bag.
2. Open the blue clamps to allow new dianeal to run from the
fill bag to the drain bag, to the count of five.. slowly and
watch the new solution flow into the drain bag (this step
flushes the Y connection, so air will not enter the
peritoneum).
3. Clamp the fill line. Clamp the drain line.
E. FILL:
1. Open the fill line clamp. Open the patient's transfer set to
allow the Dianeal fluid to fill the peritoneum. Usually, the
Dianeal fluid can run in wide open, and it takes about 5-10
minutes depending on volume and patient’s tolerance (The
most common complaint is cramping, and you may need to
slow the Dianeal fluid down by clamping the fill line for a few
minutes. You may also lower the IV pole for less rapid
infusion, according to patient's response.)
2. When the fill is complete, twist close the transfer set.
F. DISCONNECT AND CAP:
1. Close the patient’s room door and post the sign “Procedure
in Progress, Do Not Enter.”
2. Everyone in the patient’s room should apply masks.
TITLE: CAPD EXCHANGE PROCEDURE
(dpd02)
PAGE: 4 of 5
3. Perform hand hygiene.
4. Make sure the fill line and transfer set are all clamped.
5. Open the new cap package and check that the povidoneiodine
sponge inside the cap is present and wet. If not,
obtain another cap.
6. Don sterile gloves.
7. Disconnect the Ultrabag from the transfer set.
8. Apply the new cap to the transfer set. Make sure the cap
and transfer set maintain their sterility. DO NOT let the
transfer set touch anything.
G. EMPTYING THE EFFLUENT / OBTAINING A
MEASUREMENT OF EFFLUENT OUTPUT
1. You may weigh the effluent using the hanging scale to
obtain a measurement of effluent output. Make sure the
scale is on zero before taking a measurement.
2. Take the Dianeal bag to the bathroom, while you are still
wearing your gloves.
3. Cut the tubing with dedicated scissors from the disposable
suture removal set.
4. Empty the drainage into a 2000 ml suction canister.
5. Observe the fluid for color, clarity, and for fibrin.
6. Obtain measurement.
7. Carefully empty the effluent into the toilet. (This is body fluid
and is considered contaminated.
8. Dispose of the Dianeal bag into a red bag. Make sure you
have removed the blue clamps from the tubing.
